Do you want to create a free blog?, you can create one by using "Google Blogger"
Blogging is a great career option for those who are interested in writing/content creation.
For beginners, especially young bloggers who want to learn blogging and might be interested in starting as a career, then Google Blogger will be a great choice.
In this post, I'm going to explain to you the simple steps behind the blog-creating process by using Google Blogger.
Introduction To Blogger:
Let me tell you some facts about Google Blogger before I enter into the blog-creating steps.
Blogger was invented in the late 1990s and was acquired by Google in 2003. After being acquired by Google, Blogger had more features than earlier.
Blogger is a free content management system (CMS) provided by Google with the subdomain of "blogspot.com" Example: blogscoach.blogspot.com
In Blogger you don't need to spend any single penny of money to start and host your blog. Everything you will get for free and also unlimited.
Everything is free, Free Hosting, Free Domain, Free SSL Certificate and Free Unlimited Bandwidth.
This is a small introduction to the blogger platform and now let me start the blog-creating steps one by one.
Sign In To Google:
Sign In Using A Google Account:
After this, you have to sign in by using your Google account. You need to enter your email and password and then click the next button.Title Of Your Blog:
After the successful sign-in process. You will be redirected to the blog creation process. Here is where the actual blog creation process starts.
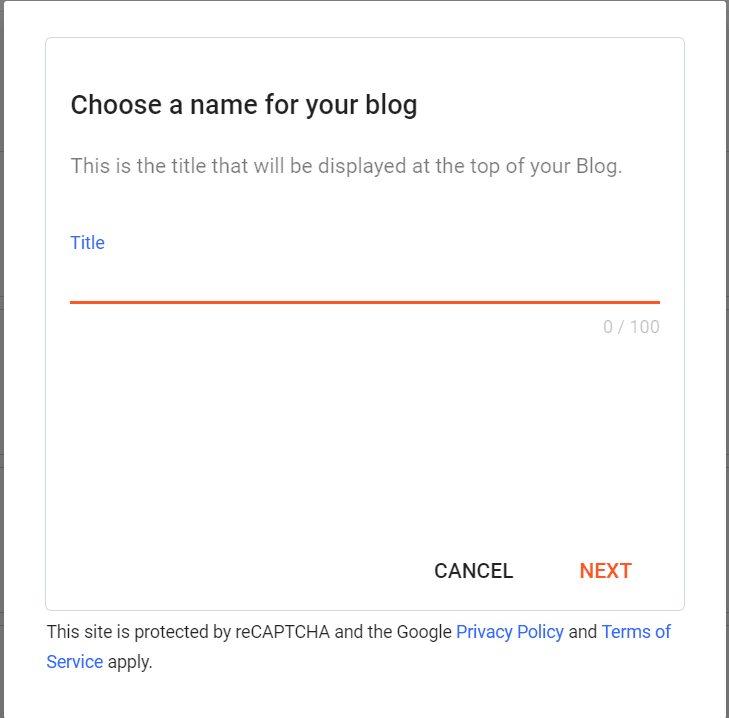
First, you need to enter the title of your blog. The title is the thing that is displayed at the top of your blog.
You can choose any title of your own. It can be the same as before or you can choose a unique blog title.
The title has a maximum of 100 characters and it should not exceed the limit. But keep the title very short and simple as 2 to 3 words about your blog. Those 2 to 3 words should explain about the blog.
Or you can simply keep your name as the title of your blog.
My blog title is "Indhu Prakash"
See the below image to clearly understand this process.
 |
| Blogger Title |
Domain Name:
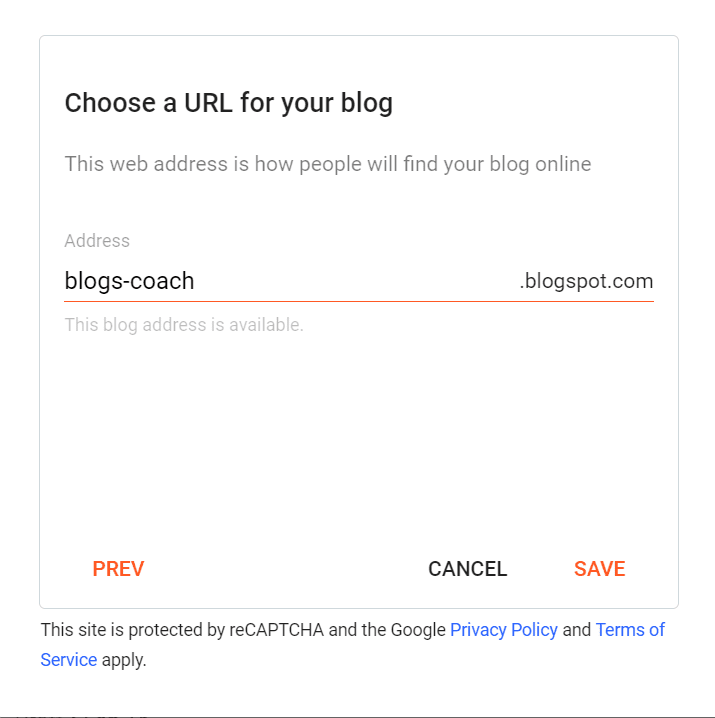
After giving a great title to your blog. You have to click the next button. This will lead you to the next important step. The choice of the domain name is very important, as it reflects the purpose of your blog.
While choosing the domain name you have to remember, some important steps. The domain name you are choosing should be,
• Unique (meaning it is not already used by someone/any business).
• Simple and Clear (it should be easy to remember and simple to read, write and type).
• Don't Merge With Others (don't try to choose a similar name which already exists, because it will affect your business/blog purposes).
Example: amazon.com is already already a big existing brand. If you choose a name with the same name(like amason.com) it will affect your blog only.
So try to choose a unique and clear domain name. Then only it will become a brand.
My blog domain name is BlogsCoach 🙂
See the below image to understand more.
 |
| Blogger Domain Name |
Blogger DashBoard:
After completing all the steps, click save and finish button to create your blog. Then you will be taken to your blogger dashboard.
That's all! Congrats! You have done all the processes right. 👌🏻
And you are already on your blogger dashboard. Your blogger dashboard is the place where you can edit and customize your whole blog.
It looks like the below image.
 |
| Blogger Dashboard |
Buy a Custom Domain Name:
The domain name is the thing that visitor uses to find your blog. When creating a blog on Blogger, your domain name is created with a subdomain called blogspot.com
Example: https://blogscoach.blogspot.com/
You have to make it more professional by buying a custom domain and connecting to it. Buying and connecting a custom domain is your choice, it is not compulsory to have a custom domain.
But having a custom domain makes your blog more professional. So I recommend you buy a custom domain and connect it to your blogger domain.
You can see the below image it understand this process more clearly.
 |
| Custom Domain |
 |
| Blog View |
Frequently Asked Questions: (FAQ's)
Is Blogger 100% free?
How do I start a 100% free blog?
Is Blogger a free blogging platform?
How do I create a blog without paying?
How much does Blogger pay for 1,000 views?
How do you get 1,000 views a day on Blogger?
What blog site is free?
Is Blogger good for SEO?
Does Blogger pay you?
Is Blogger free of cost?
How much does Google Blogger pay for 10,000 views?
What blog site is free?
Is Blogger good for SEO?
Do blogs pay you?
How to start blogging?
How to earn from a blog?
How much can a beginner blogger earn?
how to create a blog for free and make money
how to create a blog on blogger step-by-step pdf
blogger app


Share Your Thoughts Here, ...